Designing a New Layout
The Placez application stores re-created floor plans in the Place Library for use when creating your scenes (events). It is important to differentiate between two terms: floor plan and layout. The floor plan is your scaled diagram of a room or building viewed from above. The floor plan may include walls, windows, doors, fixtures, etc., necessary to the purpose of the floor plan. When creating a new scene, remember that you must first have a floor plan in place, and then you will apply a scene layout to the floor plan. Layouts can change depending on your occasion and setup styles; floor plans should not be changed unless the room's dimensions have been physically altered and the floor plan needs to reflect those changes.
- Click or tap the Scenes option
 on the sidebar along the left side of your screen.
 - Open the scene to which you want to add a layout, or add a new scene. See Finding an Existing Scene or Adding or Editing a Scene
Note: If your Placez program is integrated with Caterease event planning program, scenes can be automatically retrieved or created through the interface. See the Caterease help documentation for more information.
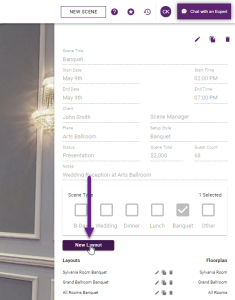
- Click/tap the New Layout button, located on the right-hand side of the Scene Details screen.
Result:The Select Floorplan modal appears.
- [Optional] If the "Place" (venue) for this scene has multiple floorplans, select the one you want for your new layout.
- [Optional] Enter a name for your new layout (ex., "Lunch Buffet").
- Click Create to create a new, empty layout using the chosen floorplan.
- Click/tap the Edit button
 , located in the upper left-hand corner of the Layout screen.
 - Add and arrange objects in your layout as described in the sections below.

Objects such as tables, chairs, etc. can be added to your custom layout individually or in batch. Placez offers a default model library depending on your industry (Banquet Library, Home Furnishings Library, Fitness Library, etc.) - and additional libraries or catalogs can be purchased if desired.
- Create a layout or open an existing layout to edit. (See above section, "Creating a Layout", for more information.)
- Click the Edit Layout button
 on the top left of the layout screen if not already in Edit mode.
 - In the Add Items panel on the right side of the layout screen, click/tap the down arrow under your library name and select a main category of objects ("Tables", "Seating", etc.).
Result: A subcategory menu opens.
Note: To locate objects quickly, click in the Search Library field at the top of the Add Items panel and type any text. All items with that text associated to them will be instantly listed for you. You can also click the Favorites tab or Groups tab
  to access a custom list of objects saved for easy access. (SeeSaving an Object as a Favorite and Saving and Using a Group of Objects for more details.) If you purchased additional model libraries, click the plus sign to the right of the library name to choose a different library.
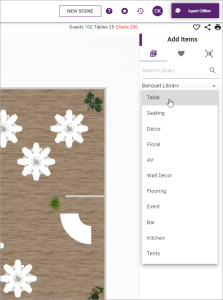
- Click/tap the the title of any subcategory to expand that group of objects.
Result: The items available in the selected subcategory appear in the drop-down area.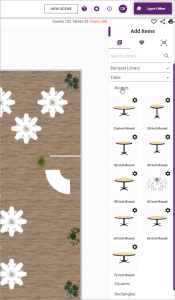
- Select any item and place it in its desired location by clicking/tapping on the item, holding, then dragging the item into position on the layout.
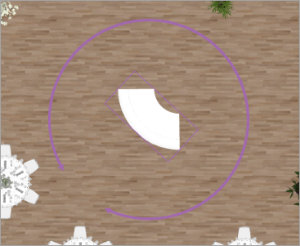
Note: You can use the handy Table Wizard to customize any table - adding chairs, linen, place settings, etc. See Customizing Tables with the Table Wizard. - Optionally rotate an item by first clicking/tapping on the item to display a circular rotation arrow and then dragging one of the arrow heads to rotate.
Note: You can select multiple objects and rotate them simultaneously by holding your [Ctrl] key (Windows) or [Command] key (Mac) - or tapping the Multi-Select button at the bottom left of the layout - and choosing from an inner or outer rotation circle to rotate them all around individual axes or all around one fixed point, respectively.
- Optionally assign a certain amount of spacing around any object by select one or multiple objects and editing the Spacing option in the Edit Item area along the right side of the window.
Note: Items will not move automatically when "Spacing" is adjusted; when you drag items in the layout, you will see a "bounding box" around each item to indicate spacing and the item will turn red if it is too close to any other object.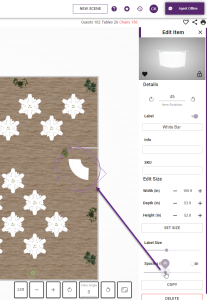
- Continue inserting and arranging remaining items in your layout design, repeating the steps above.
- When finished, click/tap the Save button
 at the top left of the screen to save your changes.
- As described in the section above, ensure your layout is in Edit mode and then search for and select the object you would like to add to the layout "in batch."
- Click/tap the item, then click the Batch Item button, located at the bottom right-hand corner of the window.
Result: The pane on the right side of the window shows various Batch settings.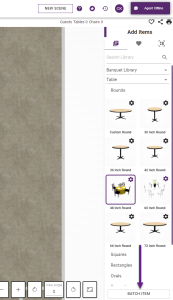
- Click the down arrow next to theGrid batch pattern in the settings along the right side of the window and choose a "Grid", "Checker" or "Conference" pattern for your batch placement.
- In your layout, hold your left mouse button and drag a window where you want your batch of objects to be placed.
Result: A purple shaded area will display and will "follow" behind your cursor as you drag across the screen. - Release your mouse button at the spot where you would like to end the item insertion.
Result: The items will display in the shaded area you outlined.
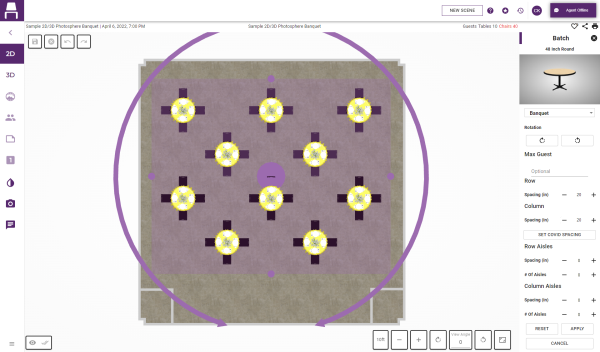
- In the Batch settings pane on the right side of the screen, optionally set the maximum number of rows and the maximum number of columns and adjust row and column Spacing (in inches) as desired.
- [Optional] Click/tap the Rotation buttons in the Batch settings pane on the right side of the screen to rotate all placed objects clockwise or counterclockwise.
- Click the Apply button, located on the lower right-hand corner of the window, to set the objects in the layout.
- Optionally arrange individual items within the layout by clicking on an item and repositioning it as described in the section above, or selecting multiple items and moving them as a group.
- Click/tap the Save button
 at the top left of the screen to save your changes.
See Also:
Customizing Tables with the Table Wizard
Saving an Object as a Favorite